
Azure Firewall is a platform-as-a-service (PaaS) firewall provisioned by Microsoft Azure. Traditional firewalls required you to take care of a number of things on virtual machines i.e. loading the software and managing the infrastructure. Azure Firewall does everything in the background. You can provision a firewall in minutes and think about security rules instead of maintenance.
Azure Firewall also provides centralized policy management and automatically scales to meet changing demands – all while integrating natively with Azure services. This blog post explores Azure Firewall, its key features, and implementation steps.
Key Features of Azure Firewall
- DNAT and SNAT
- Network Rules
- FQDN Filtering
- Application Rules
- Threat Intelligence
- Central Policy Management
- High Availability & Auto-Scaling
- Seamlessly integrates with Azure Monitor
Azure Firewall SKUs in 2025
| SKU | Throughput | Key Features |
|---|---|---|
| Basic | 250 Mbps (Fixed) | DNAT/SNAT, Threat Intel in Alert mode only. |
| Standard | Auto up to 30 Gbps | L3–L7 filtering, Threat Intel with Alert/Deny modes. |
| Premium | Auto up to 100 Gbps | Everything in Standard + TLS inspection, IDPS (67k signatures), Web Categories |
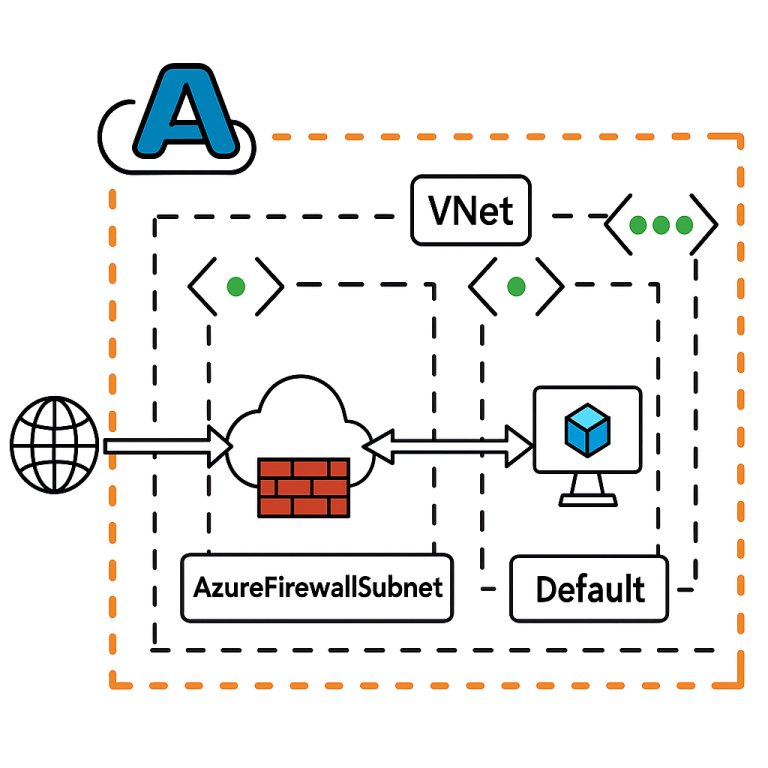
Deploying Azure Firewall follows a straightforward process. Below are the high-level steps, illustrated with an architectural diagram.
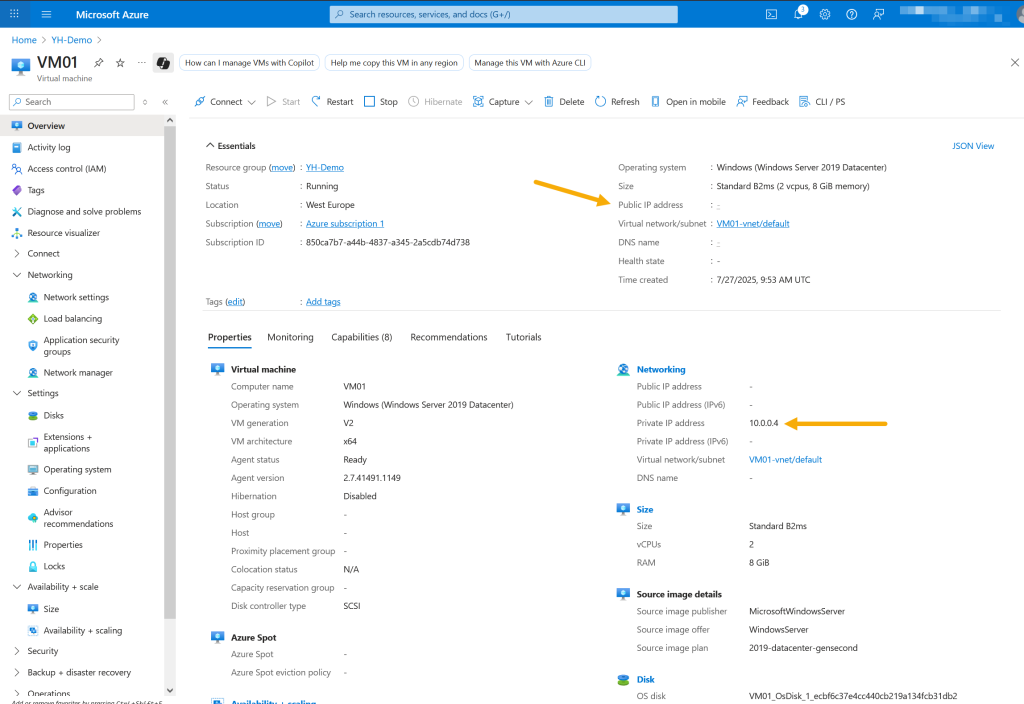
Before provisioning the Azure Firewall, We will navigate to the virtual machine (VM01) overview in the Azure portal to confirm it has no public IP address and it has 10.0.0.4 as a private IP address.
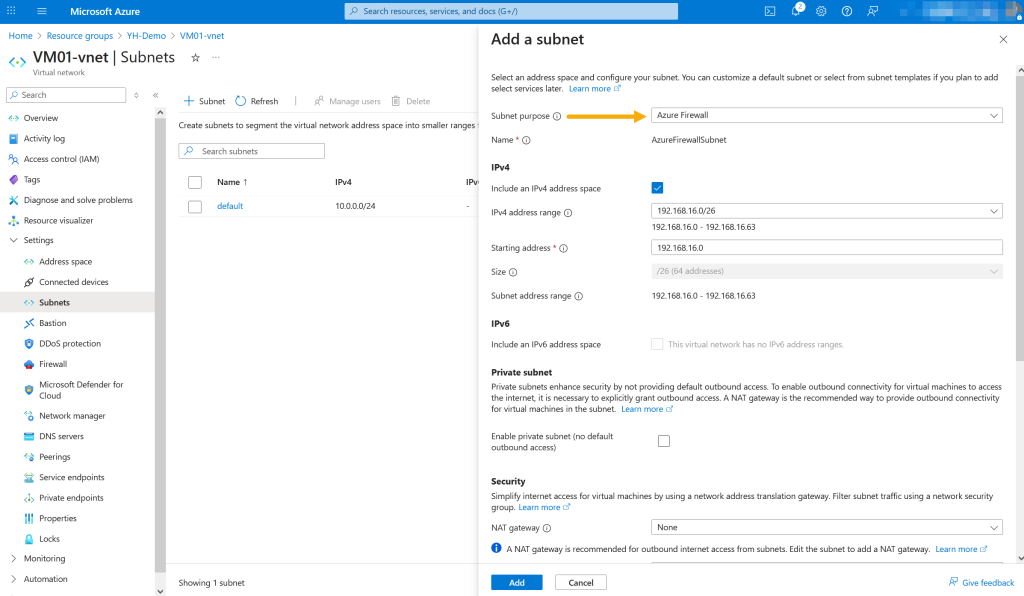
In the virtual network (VM01-vnet) Subnets blade, click “+ Subnet” to open the configuration pane, select “Azure Firewall” as the subnet purpose, and set an IPv4 address range with a /26 prefix (e.g., 192.168.16.0/26) to support firewall scaling.
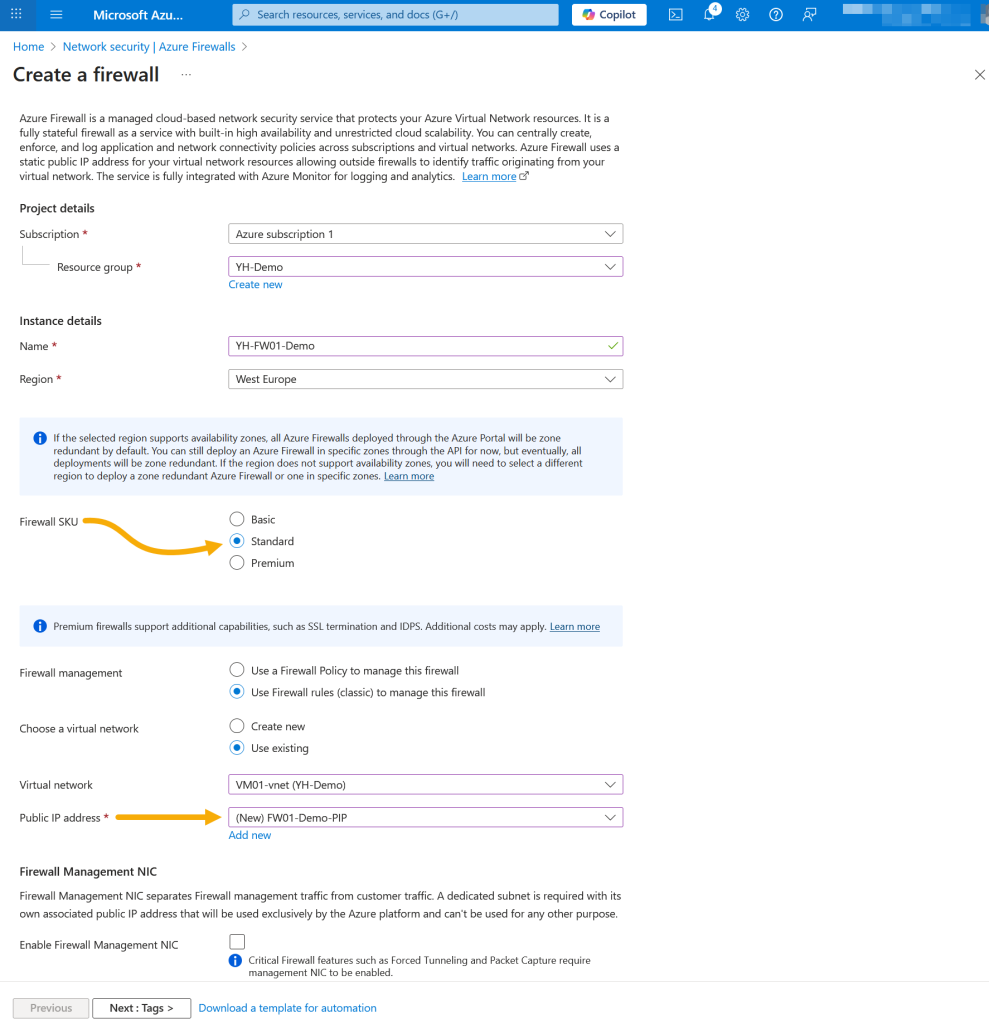
Now we’re ready to create the Azure Firewall. Begin by selecting your subscription and resource group, then specify a firewall name and ensure the region matches that of your virtual network. For the SKU, choose Standard – you can upgrade to Premium later if advanced features like TLS inspection or IDPS are needed. Under Firewall management, select Firewall rules (classic) for this setup. Next, choose your existing virtual network, and then create a new public IP address for the firewall.
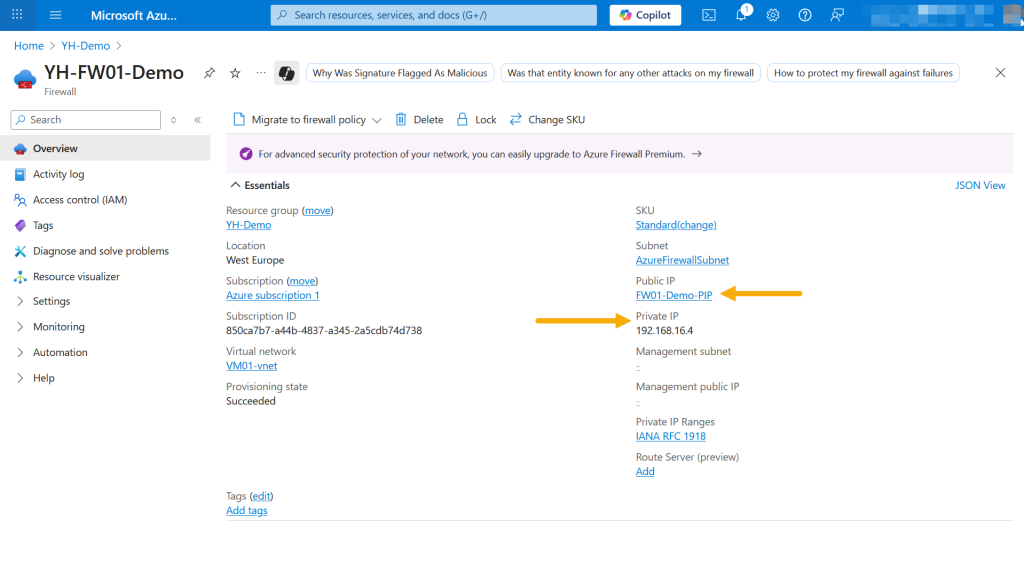
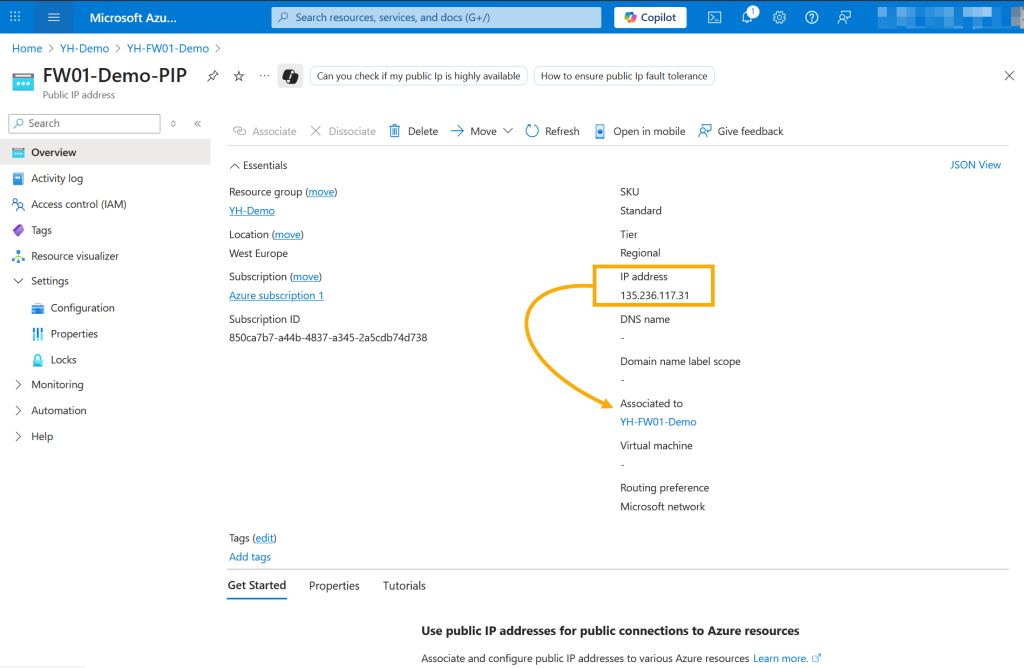
After the Azure Firewall is created, navigate to its Overview page to review key details such as the SKU, the associated subnet, the private IP address (used for internal routing) and the public IP address (used for external access). To obtain the public IP address, click on the public IP name listed in the overview.
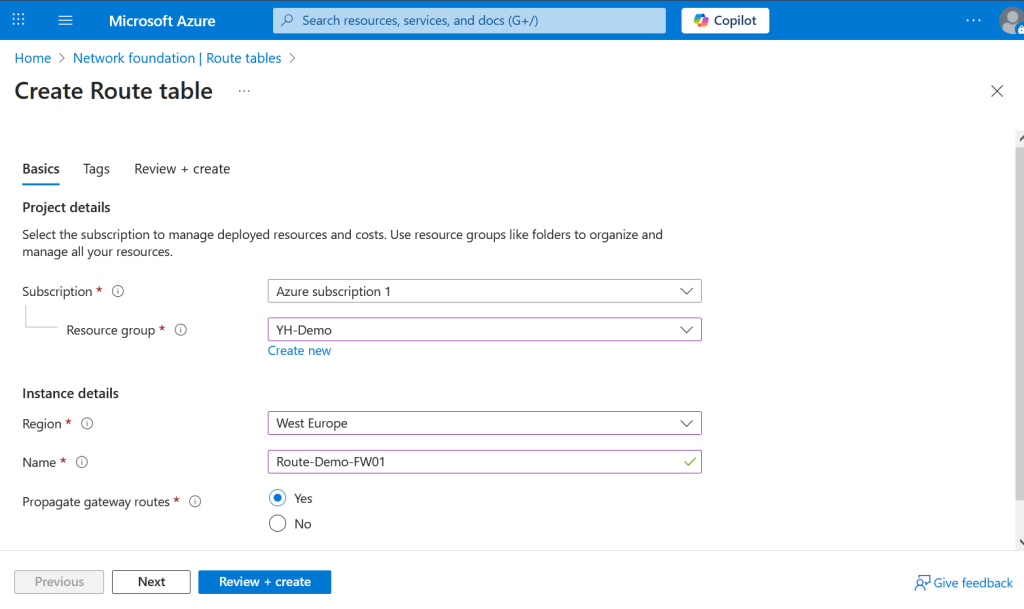
Next, create a route table by selecting your subscription and resource group, and setting the region to match your existing resources. Provide a name for the route table, and ensure “Propagate gateway routes” is set to Yes to allow route propagation from virtual network gateways. Once configured, click “Review + Create” to validate and deploy the route table.
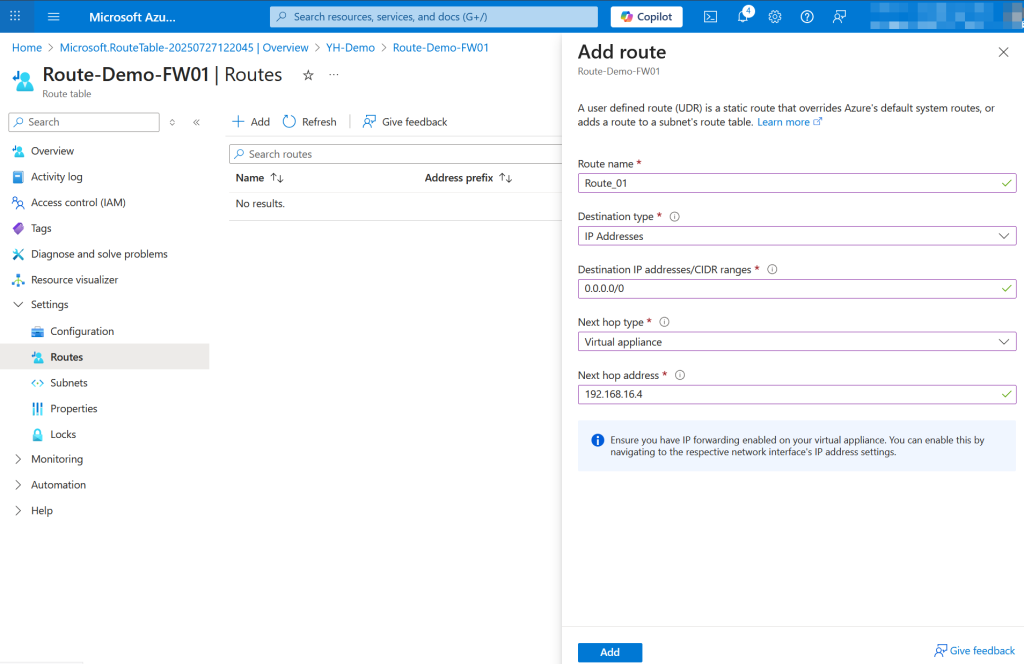
In the Routes blade of the newly created route table, click “Add” to create a new route. Set a name for the route, choose “IP Addresses” as the destination type, and enter 0.0.0.0/0 as the address prefix to route all outbound traffic. For the next hop type, select “Virtual appliance”, and enter the private IP address of your Azure Firewall as the next hop address. Click “Add” to save and apply the route.
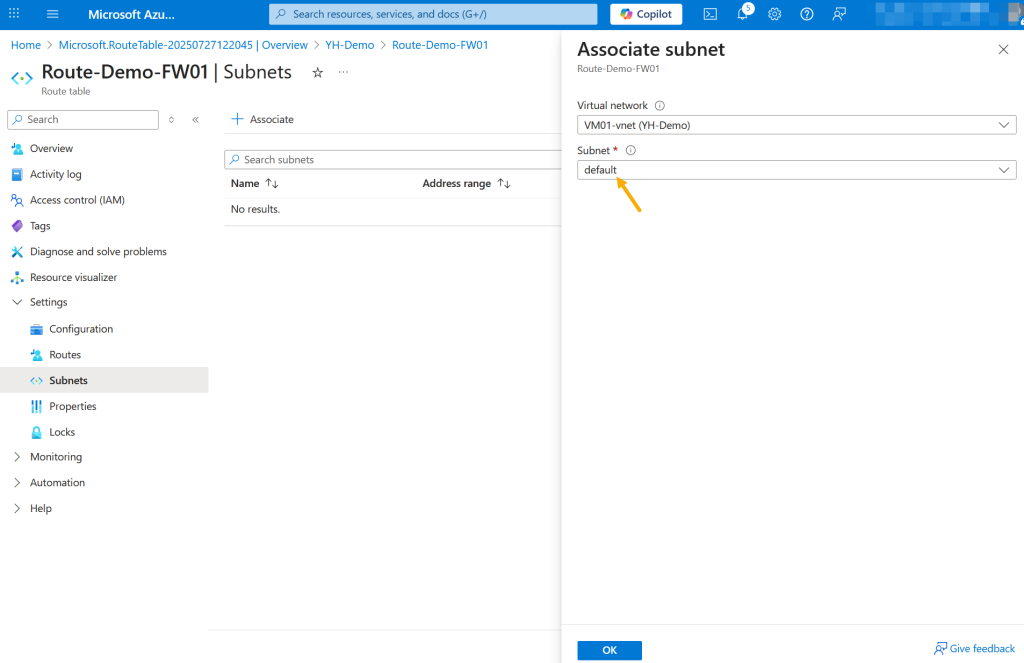
In the Subnets blade of the route table, click “Associate” to link the route table to a subnet. Select your virtual network, then choose the default subnet where your virtual machine is deployed. Click “OK” to complete the association – this ensures that all traffic from that subnet is routed through the Azure Firewall.
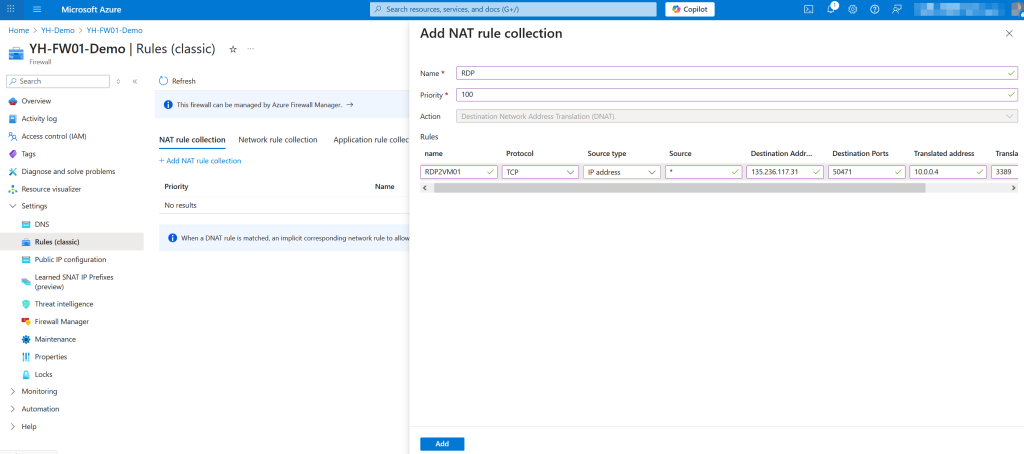
Now let’s create a DNAT rule to allow RDP access to VM01.
In the firewall’s Rules (classic) blade, under the NAT rule collection section,
click “+ Add NAT rule collection”.
Provide a name for the collection, set the priority (e.g., 100), and choose DNAT as the action type. Next, add a rule with the following settings:
Protocol: TCP
Source: * (any) – Only in Demo – (NEVER do this in Production)
Destination: The public IP address of the Azure Firewall
Destination Port: A custom port of your choice (e.g. 50471)
Translated IP Address: The private IP address of VM01
Translated Port: 3389 (RDP)
Click “Add” to save and apply the rule. This will enable external RDP access to your VM through the firewall using the specified custom port.
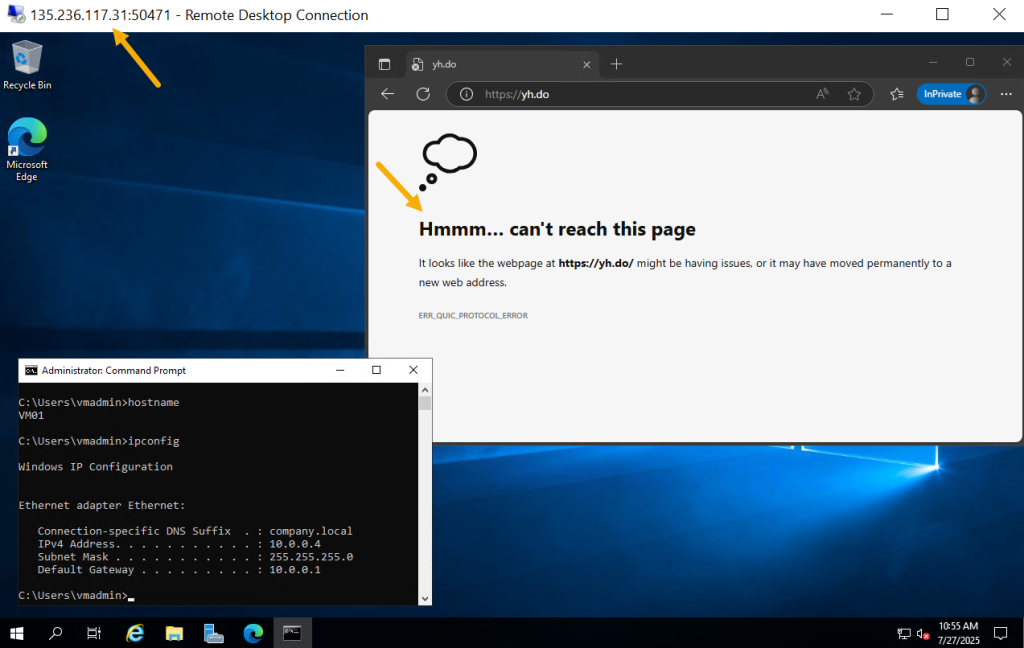
After successfully connecting to VM01 via RDP using the firewall’s public IP and the custom port (4571), open Microsoft Edge on the VM and attempt to browse a website. The request will fail, displaying a connection error – this is expected, as HTTP/HTTPS traffic is not yet allowed through the firewall.
To enable outbound internet access, let’s create an Application Rule.
In the firewall’s Rules (classic) blade, navigate to the Application rule collection section and click “+ Add application rule collection”. Configure the rule collection as follows:
Name: Choose a descriptive name (Allow-HTTPS-Out)
Priority: 101 (reserving 100 for potential future rules like blocking specific website categories)
Action: Allow
Then, add a rule with these settings:
Source Type: IP addresses
Source IP Addresses: Enter your subnet range (10.0.0.0/24)
Protocol: HTTPS
Target FQDNs: * (to allow all domains)
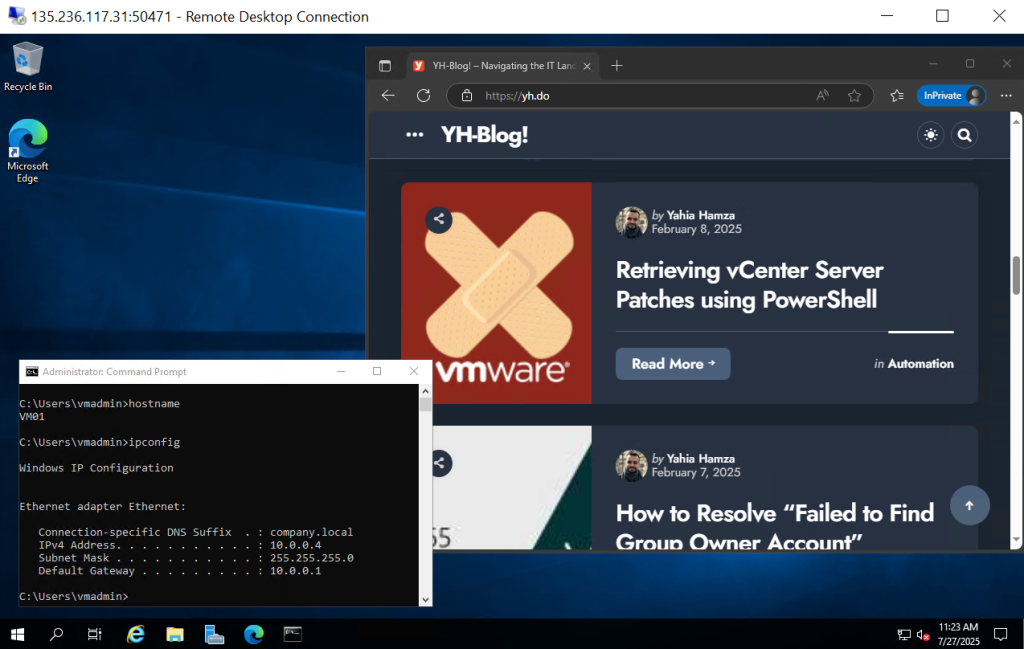
Click “Add” to save and apply the rule. This will enable VMs within the subnet to access external websites over HTTPS Only.
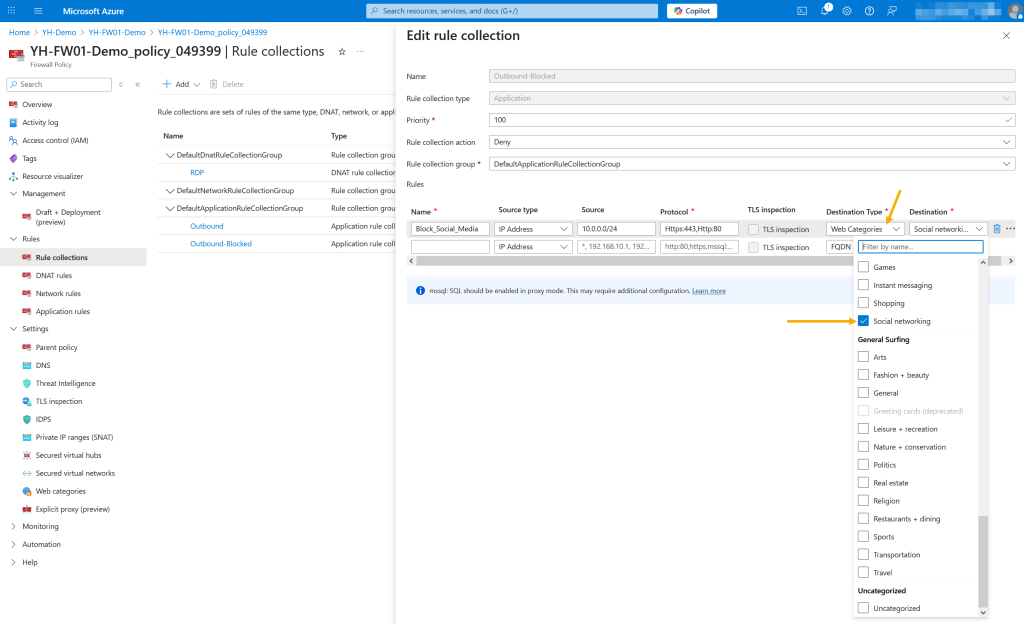
When you’re using the Premium SKU of Azure Firewall – which adds features like TLS inspection, Intrusion Detection and Prevention System (IDPS) with over 67,000 threat signatures, and web category filtering – you can now configure advanced rules.
To block access to social networking sites, follow these steps:
In the Firewall Policy under the Rule Collections blade, locate or create an Application Rule Collection.
Set the priority to 100 (to ensure it takes precedence) and the action to Deny.
In the rule settings:
Source Type: IP addresses
Source IP Address: Your subnet range (10.0.0.0/24)
Protocols: Select both HTTPS and HTTP
Destination Type: Choose Web Categories
Web Category: Select “Social networking”
Click “Add” or “Save” to apply the rule.
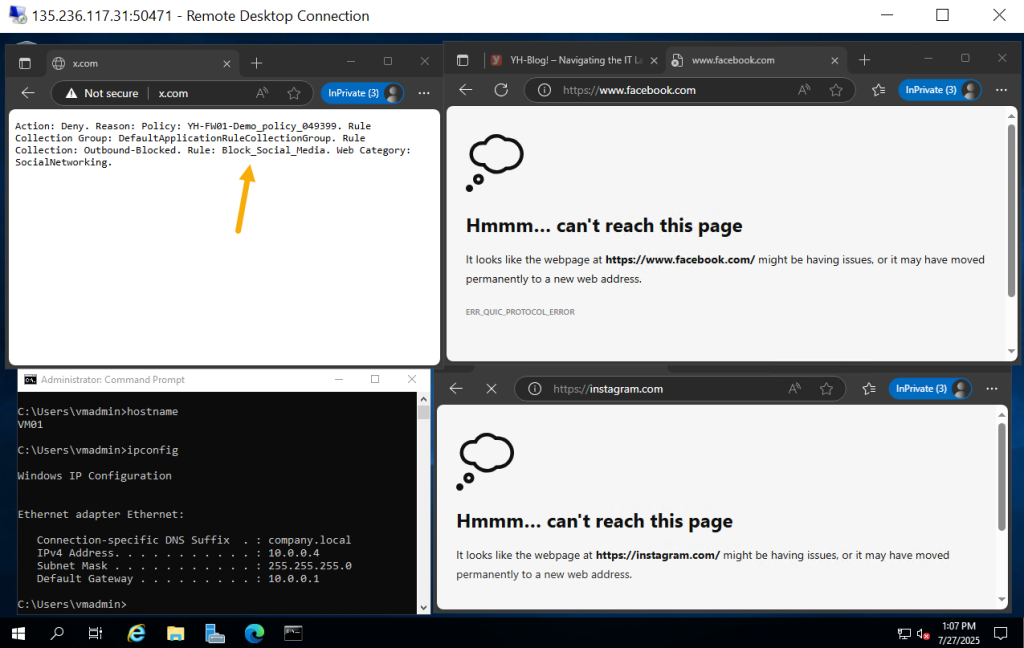
This rule will block all HTTP/HTTPS access from the specified subnet to social networking sites, leveraging Azure Firewall Premium’s web content filtering capability.
If you prefer using Terraform, the same setup can be deployed with a clean, declarative configuration. Below is the Terraform example code to provision the required network, firewall, routing and firewall rules.
variable "location" {
  default = "westeurope"
}

variable "resource_group" {
  default = "YH-Demo"
}

data "azurerm_resource_group" "rg" {
  name = var.resource_group
}

data "azurerm_virtual_machine" "vm01" {
  name                = "VM01"
  resource_group_name = data.azurerm_resource_group.rg.name
}

resource "azurerm_virtual_network" "vnet" {
  name                = "VM01-vnet"
  address_space       = ["10.0.0.0/24", "192.168.16.0/26"]
  location            = data.azurerm_resource_group.rg.location
  resource_group_name = data.azurerm_resource_group.rg.name
}

resource "azurerm_subnet" "firewall_subnet" {
  name                 = "AzureFirewallSubnet"
  resource_group_name  = data.azurerm_resource_group.rg.name
  virtual_network_name = azurerm_virtual_network.vnet.name
  address_prefixes     = ["192.168.16.0/26"]
}

resource "azurerm_subnet" "vm_subnet" {
  name                 = "default"
  resource_group_name  = data.azurerm_resource_group.rg.name
  virtual_network_name = azurerm_virtual_network.vnet.name
  address_prefixes     = ["10.0.0.0/24"]
}

resource "azurerm_public_ip" "firewall_pip" {
  name                = "FW01-Demo-PIP"
  location            = data.azurerm_resource_group.rg.location
  resource_group_name = data.azurerm_resource_group.rg.name
  allocation_method   = "Static"
  sku                 = "Standard"
}

resource "azurerm_firewall" "firewall" {
  name                = "YH-FW01-Demo"
  location            = data.azurerm_resource_group.rg.location
  resource_group_name = data.azurerm_resource_group.rg.name
  sku_name            = "AZFW_VNet"
  sku_tier            = "Premium"
  firewall_policy_id  = azurerm_firewall_policy.fw_policy.id

  ip_configuration {
    name                 = "fw-ipconfig"
    subnet_id            = azurerm_subnet.firewall_subnet.id
    public_ip_address_id = azurerm_public_ip.firewall_pip.id
  }
}

resource "azurerm_route_table" "rt" {
  name                = "Route-Demo-FW01"
  location            = data.azurerm_resource_group.rg.location
  resource_group_name = data.azurerm_resource_group.rg.name
}

resource "azurerm_route" "default" {
  name                   = "Route_01"
  resource_group_name    = data.azurerm_resource_group.rg.name
  route_table_name       = azurerm_route_table.rt.name
  address_prefix         = "0.0.0.0/0"
  next_hop_type          = "VirtualAppliance"
  next_hop_in_ip_address = azurerm_firewall.firewall.ip_configuration[0].private_ip_address
}

resource "azurerm_subnet_route_table_association" "assoc" {
  subnet_id      = azurerm_subnet.vm_subnet.id
  route_table_id = azurerm_route_table.rt.id
}

resource "azurerm_firewall_policy" "fw_policy" {
  name                = "fw-policy"
  resource_group_name = data.azurerm_resource_group.rg.name
  location            = data.azurerm_resource_group.rg.location
  sku                 = "Premium"
}

resource "azurerm_firewall_policy_rule_collection_group" "main" {
  name               = "main-policy-rules"
  firewall_policy_id = azurerm_firewall_policy.fw_policy.id
  priority           = 100

  nat_rule_collection {
    name     = "RDP"
    priority = 100
    action   = "Dnat"
    rule {
      name                = "RDP2VM01"
      protocols           = ["TCP"]
      source_addresses    = ["*"]
      destination_address = azurerm_public_ip.firewall_pip.ip_address
      destination_ports   = ["50471"]
      translated_address  = data.azurerm_virtual_machine.vm01.private_ip_addresses[0]
      translated_port     = "3389"
    }
  }

  application_rule_collection {
    name     = "Block_Social_Media"
    priority = 200
    action   = "Deny"

    rule {
      name             = "deny-social"
      source_addresses = ["10.0.0.0/24"]
      web_categories   = ["SocialNetworking"]
      protocols {
        type = "Https"
        port = 443
      }
      protocols {
        type = "Http"
        port = 80
      }
    }
  }

  application_rule_collection {
    name     = "Allow-HTTPS-Out"
    priority = 300
    action   = "Allow"

    rule {
      name             = "allow-https"
      source_addresses = ["10.0.0.0/24"]
      protocols {
        type = "Https"
        port = 443
      }
      destination_fqdns = ["*"]
    }
  }
}

output "firewall_public_ip" {
  value = azurerm_public_ip.firewall_pip.ip_address
  description = "The public IP address of the Azure Firewall"
}
Just don’t forget to import the existing VNet and subnet using your own subscription ID and resource group:
terraform import azurerm_virtual_network.vnet /subscriptions/850ca7b7-a44b-4837-a345-2a5cdb74d738/resourceGroups/YH-Demo/providers/Microsoft.Network/virtualNetworks/VM01-vnetterraform import azurerm_subnet.vm_subnet /subscriptions/850ca7b7-a44b-4837-a345-2a5cdb74d738/resourceGroups/YH-Demo/providers/Microsoft.Network/virtualNetworks/VM01-vnet/subnets/defaultFuture articles may elaborate on advanced features of Azure Firewall Premium which include TLS inspection, intrusion detection and prevention systems (IDPS), along with enhanced monitoring and logging with Azure Monitor, Log Analytics, and Microsoft Sentinel.
Final Thoughts:
Azure Firewall can be a good choice for companies that wish to improve their cloud’s security posture without involving into the complex task of maintaining third-party virtual appliances. Understanding its architecture and rule structure makes deploying and operating an Azure Firewall an effortless process in the context of your enterprise cloud.



Leave a Comment