Automating the VMs provisioning is a great way to save time and reduce errors. For those who are using Hyper-V as their virtualization platform, PowerShell offers a powerful way to streamline VM creation, especially when deploying Windows operating systems.
In this blog post, we will walk through automating the provisioning of Windows VMs on Hyper-V using PowerShell, simplifying the process to make it faster and more efficient.
Why automate the provisioning of Windows virtual machines?
Provisioning Windows virtual machines can take a lot of time, and it can also be an error-prone process if you want to provision many machines or virtual machines with complex configurations. Automation helps with the deployment of Windows virtual machines by avoiding wasted time, reducing errors and providing supersets.
Consistency: Since we create every single virtual machine using automation, the likelihood of errors is significantly reduced.
Speed: With automation doing the work, you are able to provision multiple virtual machines automatically and with minimal effort.
Scalability: Due to the automatic processes in the environment scaling, it will be easy to scale up without requiring a large amount of time.
Customizability: We will cover the script through the automation tool, where the Windows virtual machines you create can customize each of the VMs that have memory, CPU count, disk sizes, among others.
With this in mind, let’s dive into our PowerShell script that automates the provisioning of Windows VMs on Hyper-V.
<#

Author: Yahia Hamza

Description: This script creates a virtual machine, attaches a virtual switch,
              and attaches a VHD for Windows installation.
              It uses Convert-WindowsImage to install Windows on the VHD.

Date: 2024-12-25

Note: This script uses the Convert-WindowsImage.ps1 script to create a VHD and
       install Windows from an ISO. Ensure that Convert-WindowsImage.ps1 is available
       in the script's directory for the installation process.
#>

param(
    [Parameter(Mandatory)]
    [string]$vSName,  # Virtual Switch Name

    [Parameter(Mandatory)]
    [string]$VMName,  # Virtual Machine Name

    [Parameter(Mandatory)]
    [string]$DirectoryPath,  # Path to store VM (e.g., "D:\Hyper-V\VMs")

    [Parameter(Mandatory)]
    [int]$StartupMemory,  # Startup memory in GB (as integer, e.g., "4")

    [Parameter(Mandatory)]
    [int]$Gen,  # VM Generation (1 or 2)

    [Parameter(Mandatory)]
    [string]$vhdDirectory,  # Path for VHD storage (e.g., "D:\Hyper-V\VHDs")

    [Parameter(Mandatory)]
    [int]$CPUCount,  # Number of CPU cores (as integer, e.g., "2")

    [Parameter(Mandatory)]
    [string]$ISOPath,  # Path to the Windows Server ISO

    [Parameter(Mandatory)]
    [string]$Edition,  # Windows Edition to install (e.g., "Windows Server 2019 Datacenter (Desktop Experience)")

    [Parameter(Mandatory)]
    [string]$DiskLayout,  # Disk layout (UEFI or MBR)

    [Parameter(Mandatory)]
    [int]$vhdSizeGB  # Size of the VHD in GB (as integer, e.g., "90")
)

# Convert memory size to bytes
function Convert-SizeToBytes {
    param(
        [int]$SizeInGB
    )
    return $SizeInGB * 1GB  # Convert GB to bytes
}

$ConvertedStartupMemory = Convert-SizeToBytes -SizeInGB $StartupMemory
$vhdSizeBytes = Convert-SizeToBytes -SizeInGB $vhdSizeGB

# Function to attach a virtual switch to a VM
function Attach-vSwitchToVM {
    param(
        [string]$VMName,
        [string]$vSwitchName
    )

    if (Get-VMSwitch -Name $vSwitchName -ErrorAction SilentlyContinue) {
        Connect-VMNetworkAdapter -VMName $VMName -SwitchName $vSwitchName | Out-Null
        Write-Output "VM '$VMName' connected to switch '$vSwitchName'."
    } else {
        Write-Warning "Switch '$vSwitchName' not found. VM '$VMName' will not be connected to any network."
    }
}

# Function to create a new virtual machine
function Create-NewVirtualMachine {
    param(
        [string]$VMName,
        [string]$DirectoryPath,
        [int64]$StartupMemory,
        [int]$Gen,
        [int]$CPUCount
    )

    if (-not (Get-VM -Name $VMName -ErrorAction SilentlyContinue)) {
        New-VM -Name $VMName -Path $DirectoryPath -MemoryStartupBytes $StartupMemory -Generation $Gen | Out-Null
        Set-VMProcessor -VMName $VMName -Count $CPUCount | Out-Null
        Write-Output "Virtual Machine '$VMName' created successfully."
    } else {
        Write-Output "Virtual Machine '$VMName' already exists."
    }
}

# Function to create a VHDX using Convert-WindowsImage
function Create-VHDX {
    param(
        [string]$ISOPath,
        [string]$Edition,
        [string]$DiskLayout,
        [int64]$SizeBytes,
        [string]$vhdPath
    )

    if (-not (Test-Path -Path $ISOPath)) {
        Write-Error "ISO file '$ISOPath' does not exist."
        return
    }

    # Import Convert-WindowsImage.ps1 dynamically from the script's current directory
    $modulePath = Join-Path -Path $PSScriptRoot -ChildPath "Convert-WindowsImage.ps1"

    if (-not (Test-Path -Path $modulePath)) {
    Write-Error "Convert-WindowsImage.ps1 not found in the current directory: $PSScriptRoot"
    exit 1
    }

    . $modulePath  # Dot-source the script to load its functions
    Write-Output "Convert-WindowsImage.ps1 loaded successfully from $PSScriptRoot"

    Convert-WindowsImage -SourcePath $ISOPath -Edition $Edition -SizeBytes $SizeBytes -DiskLayout $DiskLayout -VHDFormat "VHDX" -VHDPath $vhdPath -ErrorAction Stop
    Write-Output "VHDX created successfully at '$vhdPath'."
}

# Function to attach an existing VHDX
function Attach-ExistingVHD {
    param(
        [string]$VMName,
        [string]$vhdPath
    )

    if (Test-Path -Path $vhdPath) {
        # Detach any existing VHDs to ensure the new one is attached
        Get-VMHardDiskDrive -VMName $VMName | Remove-VMHardDiskDrive -ErrorAction SilentlyContinue | Out-Null

        # Attach the new VHD
        Add-VMHardDiskDrive -VMName $VMName -Path $vhdPath | Out-Null
        Write-Output "VHD '$vhdPath' attached to VM '$VMName'."

        # Ensure boot order is set correctly
        if ((Get-VM -Name $VMName).Generation -eq 2) {
            Set-VMFirmware -VMName $VMName -FirstBootDevice (Get-VMHardDiskDrive -VMName $VMName) | Out-Null
            Write-Output "Boot order updated for Generation 2 VM '$VMName'."
        }
    } else {
        Write-Error "The VHD file '$vhdPath' does not exist."
    }
}

# Main execution logic
$vhdPath = Join-Path -Path $vhdDirectory -ChildPath "$VMName\$VMName.vhdx"

# Create VHDX
Create-VHDX -ISOPath $ISOPath -Edition $Edition -DiskLayout $DiskLayout -SizeBytes $vhdSizeBytes -vhdPath $vhdPath

# Create VM
Create-NewVirtualMachine -VMName $VMName -DirectoryPath $DirectoryPath -StartupMemory $ConvertedStartupMemory -Gen $Gen -CPUCount $CPUCount

# Attach vSwitch
Attach-vSwitchToVM -VMName $VMName -vSwitchName $vSName

# Attach VHDX
Attach-ExistingVHD -VMName $VMName -vhdPath $vhdPath
Key Features of the Script
ISO to VHDX Conversion:
- This script uses the Convert-WindowsImage.ps1 module to convert a Windows ISO file to a VHDX image. This step guarantees that the VHDX is ready to be used for a virtual machine deployment. You can select the Windows edition (for example, Windows Server 2025 Datacenter (Desktop Experience)) and disk layout (for example, UEFI).
Dynamic VHDX Creation:
- The VHDX file is created dynamically, which means it will expand as needed up till the desired size (in GB). You can also customize the size of the VHDX to meet your needs.
Network Configuration:
- The script attaches the new VM to an existing virtual switch (vSName), making it useful if you want network isolation or require the VM to communicate with other VMs.
Attach VHDX:
- After creating the VM, the script attaches the newly created VHDX file to make sure the machine boots with the operating system image.
How to Use the Script:
To use this script, you simply need to provide the necessary parameters when running it:
.\VMProvisioning.ps1 `
    -VMName "SRV01" `
    -vSName "vSwitch" `
    -DirectoryPath "D:\Hyper-V\VMs" `
    -StartupMemory 8 `
    -Gen 2 `
    -vhdDirectory "D:\Hyper-V\VHDs" `
    -CPUCount 2 `
    -ISOPath "C:\ISO\SRV_2025.iso" `
    -Edition "Windows Server 2025 Datacenter (Desktop Experience)" `
    -DiskLayout "UEFI" `
-vhdSizeGB 90https://yh.do/Convert-WindowsImage.ps1https://yh.do/VMProvisioning.ps1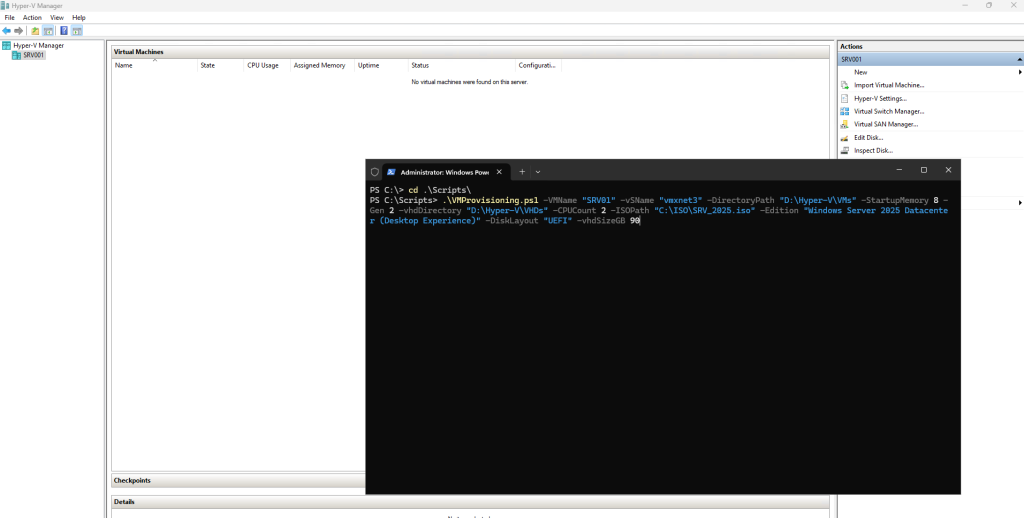
Parameters:
- VMName: Name of the virtual machine to be created.
- vSName: Name of the virtual switch to which the VM will be connected.
- DirectoryPath: Path where the VM files will be stored.
- StartupMemory: Amount of memory allocated to the VM (in GB).
- Gen: Virtual machine generation (1 or 2).
- CPUCount: Number of CPU cores allocated to the VM.
- vhdDirectory: Path where the VHDX file will be stored.
- ISOPath: Path to the Windows ISO file.
- Edition: Windows edition to install (e.g.,
Windows Server 2019 Datacenter (Desktop Experience)). - DiskLayout: Disk layout (e.g.,
UEFIorBIOS). - vhdSizeGB: Size of the VHDX file (in GB).
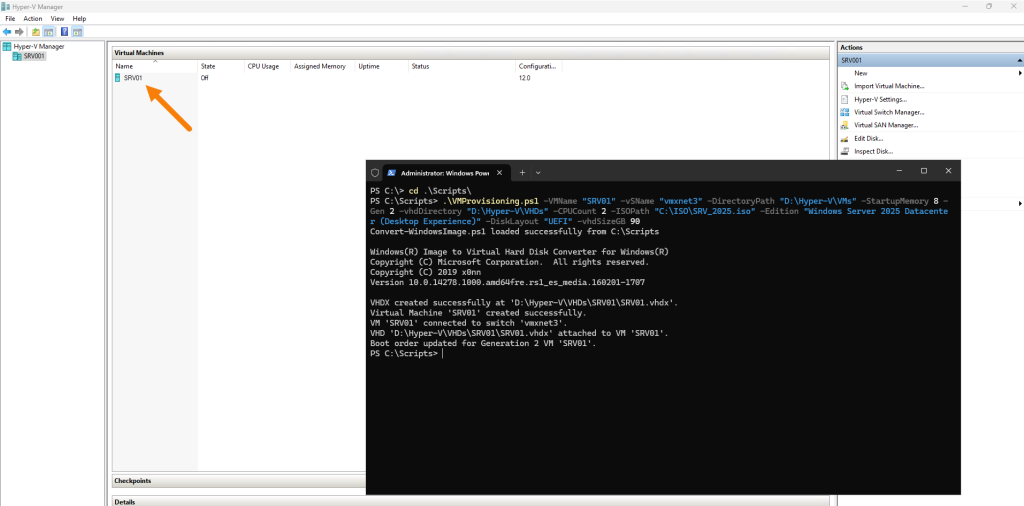
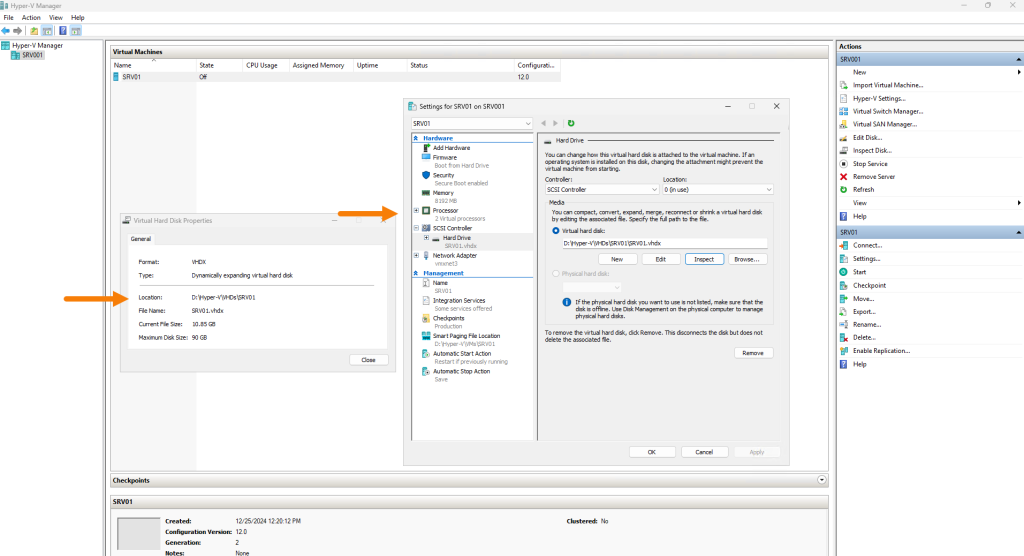
- The virtual machine named
SRV01has been successfully created in Hyper-V. - The VM is using a dynamically expanding VHDX located at
D:\Hyper-V\VHDs\SRV01\SRV01.vhdx. - The current size of the VHDX is approximately 10.85 GB, with a maximum size of 90 GB as specified during the provisioning.
- The VM is configured with:
- 2 virtual processors.
- 8 GB of memory.
- A SCSI controller attached to the VHDX file.
- Connected to the virtual switch named
vmxnet3.
Everything seems to align with the parameters specified in the script. The setup is consistent with the provisioning script’s expected output, confirming that the VM has been created and configured as intended.
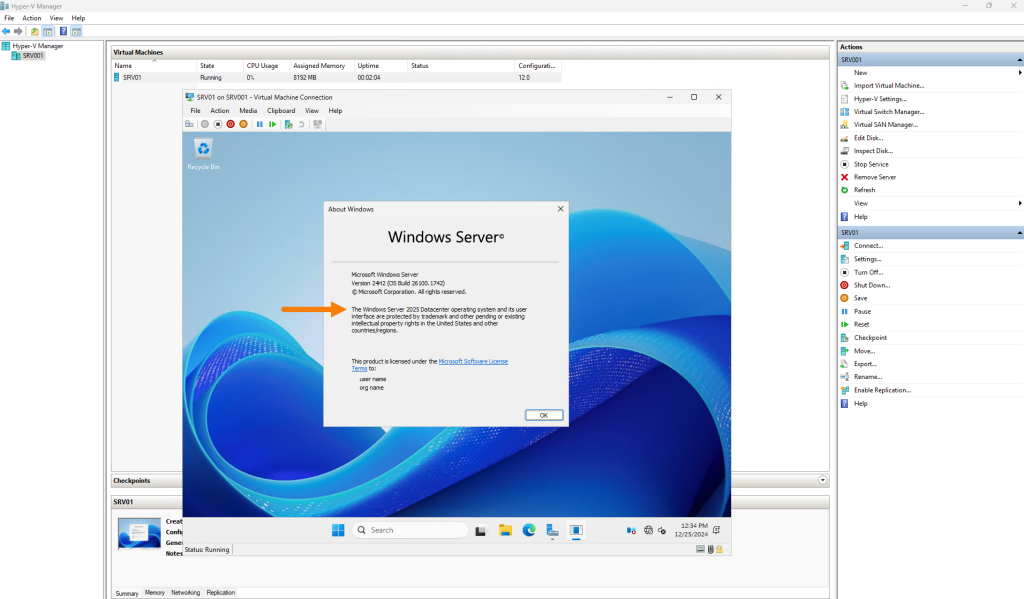
After connecting to the VM’s console and logging in, the installed operating system is confirmed as Windows Server 2025 Datacenter (Desktop Experience), as specified in the script parameters.
Taking Automation To The Next Level
If you want to scale your VM provisioning operations, you can use a CSV file to automate the procedure for several VMs. we can adjust our script to read the VM specifications from a CSV file, so you can deploy multiple virtual machines in one step with minimal effort.

Here’s an example of how you can organize your CSV file for deploying multiple VMs:
VMName,vSName,DirectoryPath,StartupMemory,Gen,vhdDirectory,CPUCount,ISOPath,Edition,DiskLayout,vhdSizeGB
VM1,vmxnet3,D:\Hyper-V\VMs,4,2,D:\Hyper-V\VHDs,2,C:\ISO\SRV_2019.iso,Windows Server 2019 Datacenter (Desktop Experience),UEFI,100
VM2,vmxnet3,D:\Hyper-V\VMs,8,2,D:\Hyper-V\VHDs,4,C:\ISO\SRV_2025.iso,Windows Server 2025 Standard (Desktop Experience),UEFI,120
VM3,vmxnet3,D:\Hyper-V\VMs,4,2,D:\Hyper-V\VHDs,2,C:\ISO\SRV_2016.iso,Windows Server 2016 Datacenter (Desktopdarstellung),UEFI,90
Using the script in the link below, you can loop through this CSV file and deploy each VM with its respective configurations automatically.
https://yh.do/MultiVMProvisioning.ps1Taking It Even Further: Using an Unattended Answer File and PowerShell Direct 🚀
An Unattended XML Answer File can be used to automate the VM setup process, including setting the administrator password, specifying network settings, and joining the Machine to a domain…etc. This file can be provided to the Convert-WindowsImage cmdlet during the VHD creation process or attached as part of the VM configuration.
PowerShell Direct is a powerful feature that allows you to directly interact with a virtual machine running on Hyper-V, even if the VM does not have network connectivity. It works by leveraging Hyper-V to establish a communication channel between the host and the VM, This allows you to configure Windows settings, install roles and features, and apply configurations quickly and securely.
Conclusion:
Automation streamlines repetitive operations, including establishing Windows virtual machines on Hyper-V. Using PowerShell scripts, we can automate the construction of VMs with custom configurations, minimizing manual work and enhancing productivity.
Whether you’re managing a single VM or deploying dozens, these strategies can help you save time and maintain consistency in your environment.


Leave a Comment