Ansible is a powerful tool for managing and configuring remote servers. To fully harness what it could offer on Linux Systems, you should have passwordless SSH login set up. Ansible connects to remote Linux systems using SSH.
Ansible normally relies on the credentials of the user running the playbook. Using passwordless authentication through SSH, Ansible can reach out to remote Linux servers automatically with no need for manual input.
Advantages of Using SSH Key Authentication for Ansible:
Security: SSH keys are more secure than passwords because they cannot be subjected to some kind of brute-force attack or guessed.
Automation: With passwordless authentication, running Ansible playbooks automatically becomes simpler without requiring human input.
Efficiency: Once set up, passwords do not have to be typed in every time Ansible connects to a node.
Step 1: Generate SSH Key Pair
On your control node (the machine you’ll use to run Ansible), generate an SSH key pair if you haven’t already:
ssh-keygen
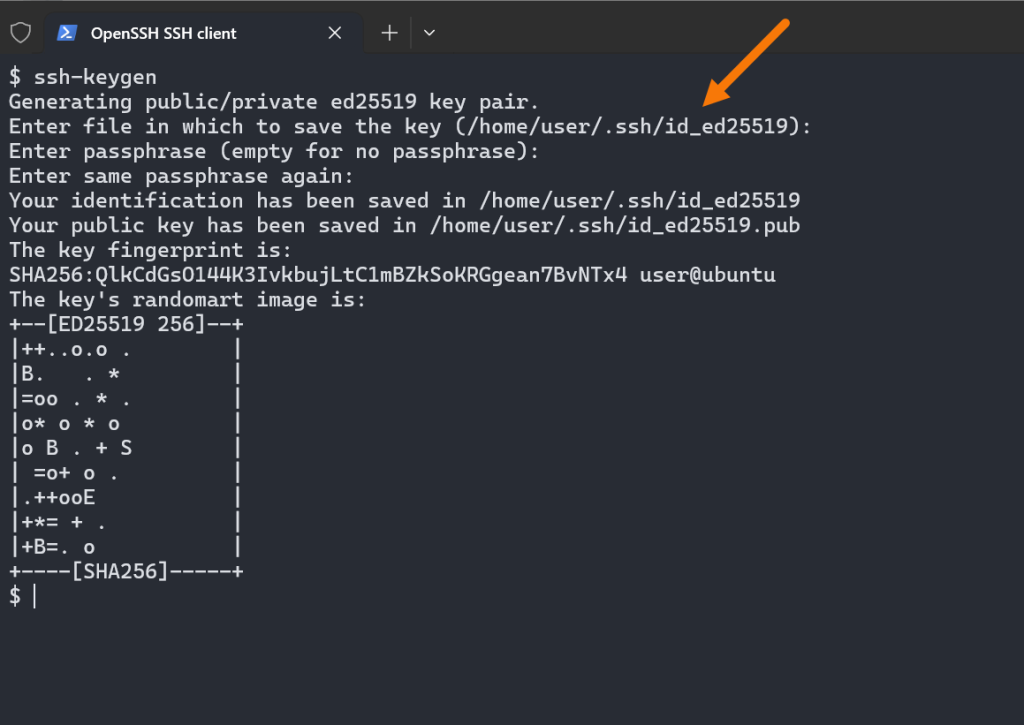
Accept the default location /.ssh/id_ed25519 and leave the passphrase empty (or use one if you prefer).
Step 2: Copy the SSH Public Key to Remote Servers
Now, copy the public SSH key to each remote server. This allows Ansible to connect securely without needing a password each time.
ssh-copy-id user@node01
ssh-copy-id user@node02
ssh-copy-id user@node03
Make sure to replace user with the appropriate username on your nodes. You’ll be prompted to enter the password once for each node.
Step 3: Verify Passwordless SSH Login
Test the passwordless SSH login to one of the nodes:
ssh user@node01
If you’re logged in without a password prompt, you’re good to go!
- You can also update your
/etc/sudoersfile on each node not to require a password for your user. This is potentially risky, so be sure to consider the security implications. You can do this by runningsudo visudoand adding the following line at the end:
user ALL=(ALL:ALL) NOPASSWD:ALL- Or you can use the
--ask-become-passor-Kcommand line option: This will prompt for the sudo password when the playbook is run.
ansible-playbook install_apache.yml -i inventory.ini --ask-become-passCreating an Ansible Inventory for Node Grouping
Ansible uses an inventory file to define the remote servers that will be managed. Here’s a very simple inventory file where we group nodes under a single label (web_servers). This makes it easy for us to apply automation tasks to all nodes in that group.
Example inventory file (inventory.ini):
[web_servers]
node0[1:3] ansible_ssh_user=user ansible_ssh_private_key_file=~/.ssh/id_ed25519
The pattern node0[1:3] will match node01, node02, and node03. This is an efficient way to manage groups of servers that follow a naming convention.
Automating Apache Installation and Configuration with Ansible
Now that we’ve set up passwordless SSH and defined our nodes in the inventory file, let’s automate a common task: installing Apache HTTP Server across multiple nodes and configuring a custom HTML page.
Step 1: Ansible Playbook to Install Apache
Create a simple Ansible playbook (install_apache.yml) to install Apache on the web_servers group.
---
- name: Install and Start Apache Web Server on Ubuntu (Multiple Nodes)
  hosts: web_servers
  become: yes
  tasks:
    - name: Update apt cache
      ansible.builtin.apt:
        update_cache: yes

    - name: Install Apache HTTP server
      ansible.builtin.apt:
        name: apache2
        state: present

    - name: Ensure Apache is started and enabled to start on boot
      ansible.builtin.service:
        name: apache2
        state: started
        enabled: yes

    - name: Create a custom HTML page with node name
      ansible.builtin.copy:
        content: |
          <html>
            <head><title>Welcome</title></head>
            <body>
              <h1>Welcome to {{ inventory_hostname }}</h1>
            </body>
          </html>
        dest: /var/www/html/index.html
        owner: www-data
        group: www-data
mode: '0644'Explanation:
hosts: web_servers: This runs the playbook on all nodes in theweb_serversgroup.become: yes: This gives Ansible permission to run tasks with elevated privileges.ansible.builtin.apt: This module is used to interact with the apt package manager on Ubuntu-based systems.ansible.builtin.service: Ensures that the Apache service is started and enabled to start on boot.
{{ inventory_hostname }}: This Ansible variable dynamically inserts the hostname of the node (e.g.,node01,node02).dest: /var/www/html/index.html: This places the HTML file in Apache’s default web root directory.- Permissions: The file is owned by
www-data, the default web server user.
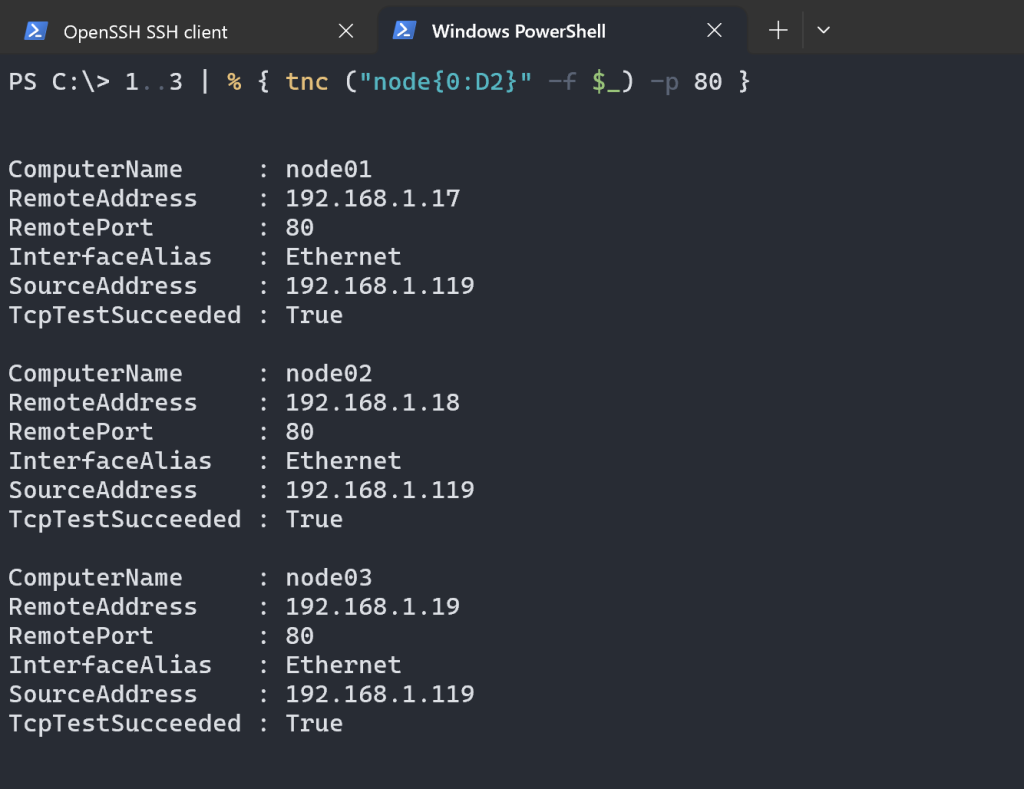
Before proceeding with the Apache installation, Let’s check if port 80 is open and accessible on all nodes.

As you can see from the output, the checks confirm that default port 80 is currently closed on all the nodes.
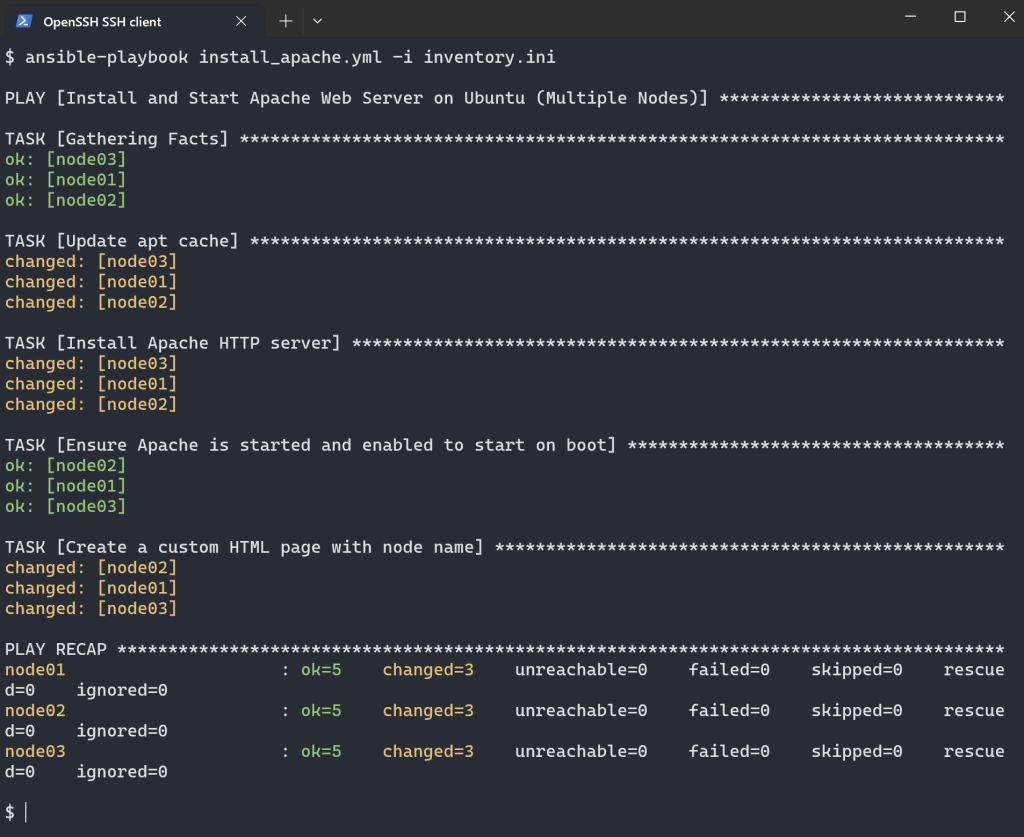
Step 2: Run the Playbook
To apply the playbook across all nodes, run the following command:
ansible-playbook install_apache.yml -i inventory.iniThis will:
- Install Apache on
node01,node02, andnode03. - Start Apache and enable it to run on boot.
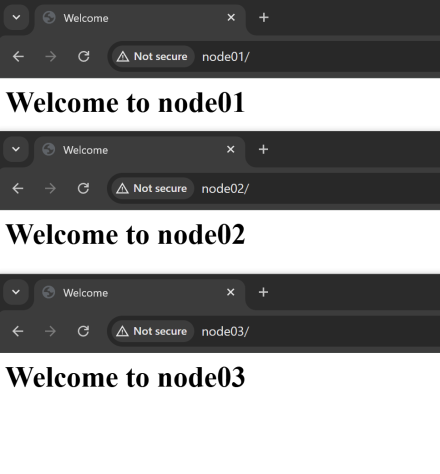
- Place a custom HTML file on each node, showing a message like “Welcome to node01” on
node01, “Welcome to node02” onnode02, and so on.
You can now check again if port 80 is open and accessible on all nodes.
Conclusion
In this article, we have explained the usage of Ansible for the automation of basic Linux tasks. You can automate nearly anything in your Linux infrastructure with Ansible and scale your operations.
Ansible can do so much more beyond just the installation of software like: System Updates, Users Management, Service Management, Cloud Automation, Application Deployment and much more.