When managing permissions for shared mailboxes in Microsoft Outlook and Exchange, it’s essential to maintain control over your organizational communication systems. Granting users access to a shared mailbox without having it automatically appear in their Outlook profile is an advantageous strategy to reduce clutter and improve email management. This article provides a comprehensive guide to setting up such permissions using PowerShell commands and covers several crucial steps and considerations to ensure a seamless user experience.
Table of Contents
Introduction
Shared mailboxes in Microsoft Outlook allow multiple users to access a common mailbox, which is ideal for customer service, team collaboration, and other collective communication needs. However, auto-mapping of these mailboxes can lead to unnecessary clutter in users’ views. By disabling auto-mapping, administrators can keep users’ Outlook interfaces clean and distraction-free, while still granting essential access to shared mail repositories.
Understanding Shared Mailbox Permissions
In the realm of Microsoft Exchange and Office 365, permissions for shared mailboxes are handled through specific roles and rights. Full Access permission allows a user to open, manage, and send email from the mailbox. However, when this permission is granted, the mailbox automatically appears in the user’s Outlook profile, unless explicitly disabled (“auto-mapped”).
Prerequisites for Managing Shared Mailboxes
Before you can manage shared mailbox permissions, ensure you have the following:
- Administrative credentials for your Exchange or Office 365 admin portal.
- PowerShell installed on your machine.
- Exchange Online PowerShell Module for Office 365 environments.
Step-by-Step Guide to Granting Permissions
Connecting to Exchange Online PowerShell
Start by connecting your PowerShell session to Exchange Online to manage Office 365 mailboxes:
Connect-ExchangeOnline -UserPrincipalName [email protected]Applying the Mailbox Permissions
Use the Add-MailboxPermission cmdlet to set up the desired permissions without enabling auto-mapping:
Add-MailboxPermission -Identity [email protected] -User [email protected] -AccessRights FullAccess -AutoMapping $false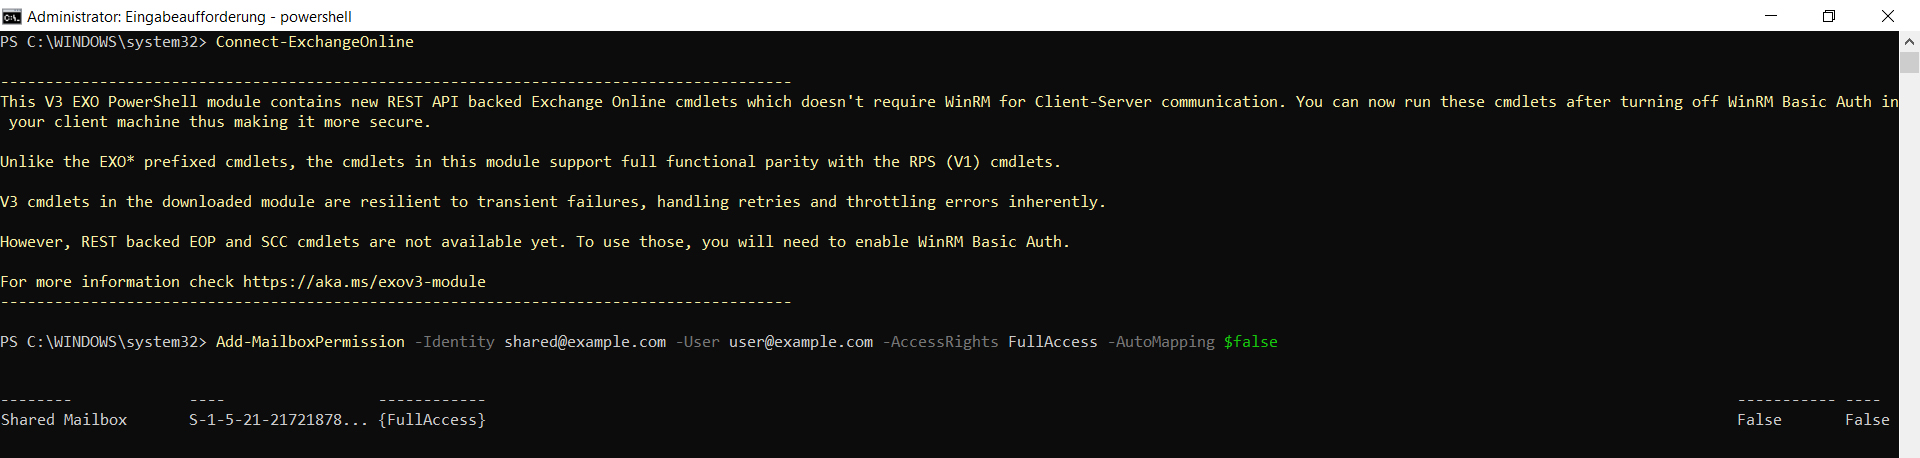
Informing the Users
Since the mailbox won’t appear automatically, inform users about how to manually add the shared mailbox to their Outlook profiles.
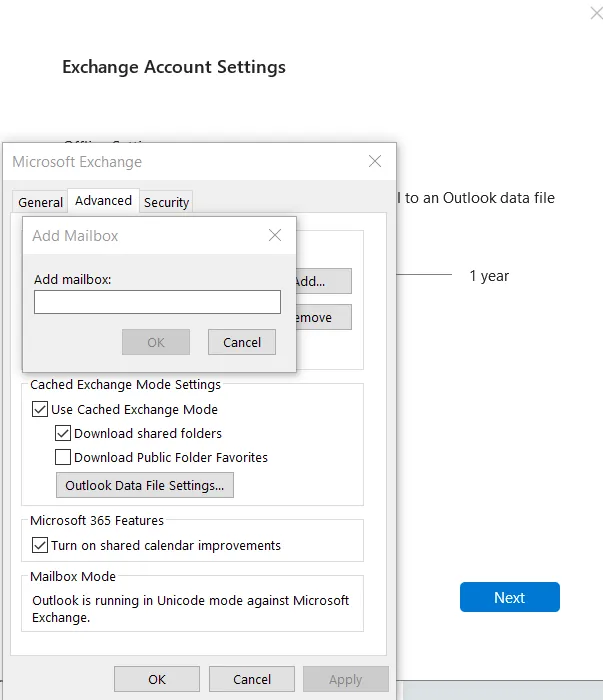
Adding Shared Mailboxes Manually in Outlook
Outlook Desktop Client
- Navigate to
File>Account Settings>Account Settings. - Select ‘Change’, then ‘More Settings’, and ‘Advanced’ before clicking ‘Add’.
- Enter the shared mailbox’s address and confirm by clicking ‘OK’.
Outlook on the Web (OWA)
- Right-click ‘Folders’ and select ‘Add shared folder’, entering the mailbox’s name.
Troubleshooting Common Issues
- Validate that PowerShell modules are up-to-date.
- Ensure correct user permissions and resolve any conflicts.
- If changes are not immediately visible, synchronize or update the Outlook address book manually.
Benefits of Manual Mapping of Shared Mailboxes
Manually adding shared mailboxes allows for better control over a user’s mailbox setup, reducing clutter and enhancing focus. It also eases administrative overhead by preventing automatic subscriptions to numerous mailboxes.
Conclusion
Managing shared mailbox access without auto-mapping provides administrators with enhanced control over email systems and user setups. By following the outlined steps, you can improve how users interact with shared resources, maintaining an organized and efficient communication environment.
This practice not only streamlines email management but also boosts productivity by curating essential communications for users, aligned with specific operational roles or requirements.